Tuesday, 19 March 2013
Saturday, 9 March 2013
How we rectified the problems we received on our feedback
-We cut some of the clips down using final cut pro again, to alter the pace of the title sequence, we wanted it to be quicker and not bore the audience.
-We faded out the music at the end of the clip like some of the feedback suggested. This gave the title sequence a more professional feel to it, like it would appear in a real film.
These were the main two issues that were raised, the pace being the main problem. We attempted to revise these issues to make the title sequence look more professional and to make it appeal to our audience more.
Tuesday, 5 March 2013


Friday, 22 February 2013
Thursday, 17 January 2013
Order of the titles
Before we begin to edit our title sequence it is important we researched the order titles appear. We did this in class, analysing the Catch Me If You Can title sequence, establishing the order each title appeared. We then applied the order to fit our film Hypnosis. We decided to also view some title sequences, and see the order in which there titles appear and base it around what we notice. We also tried to follow the codes and conventions that arise with the order of the titles.
This is the order in which our credits will appear in our sequence:
1 - Studio logo - Lionsgate
2 - Production company - A Lionsgate production
3 - Producer - An Oren Peli film
4 - Film title - Hypnosis
5 - Actor name - Lucy Ford
6 - Actor name - Dylan Webb
7 - Actor name - Kate Kurton
8 - Actor name - Alex Easlea
9 - Actor name - Simone Chapman
10 - Casting - Nancy Nayor (worked on The Grudge)
11 - Costume designer - Kristin Burke (worked on Insidious)
12 - Music - John Kurlander (worked on Woman In Black)
13 - Editor - James Cowan (worked on The Possession)
14 - Director of Photography - Daniel Pearl (worked on Friday the 13th
15 - Writers - Jon Spaihts (worked on Prometheus)
16 - Director - Oren Peli
Creating the titles
To create the titles, we decided to use Adobe After Effects due to being sort of familiar with After Effects, and looking into other After Effects videos being creating, we noticed they looked exceptionally professional and decided this software would be best for us. Dylan has made the titles and animations and this is how he did it.
This is how Dylan made the title for 'Lionsgate Pictures Presents':

Firstly, he had to create a new project. He did this by going to 'File' then 'New' then 'New Project'. Once there, all he had to do with click on the button.

After that he had to place the video he was going to edit for the title, into After Effects. He did this by selecting 'Edit' at the top, then going to 'Import' and finally going to 'File'.
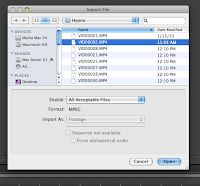
Once selecting 'File', it brought up a menu with the video clips he can use for the placing the titles onto. To select one, he had to click on the once he wanted, which was number two, then click 'Open'.

This then placed the clip into After Effects, and will now allow him to drag it into the editor and begin working on it.
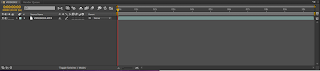
This is what it looks like once it has been dragged into the editor.

And here is the video preview for the clip once it has been placed into the editor.

Now he had to add in the text to display the title 'Lionsgate Pictures Presents'. To do this, he had to go to the editor where the video had been placed, right click on the mouse, then click 'New' and then 'Text'.

Once the video and text had been placed into the editor and positioned, He then moved onto adding the effect to the text to make it animated. To do this, there was a little menu next to the video that stated 'Effects & Presents'. Once there, I found the effect he wanted called 'Evaporated'.

Then he dragged over the effect on top of the text layer, let it load properly, then played it to see how it worked. This is what the effect looked like.

After viewing and sorting out any necessary tweaks to the text animation, he then had to export the clip so it would be suitable for Final Cut Pro. To do this, he had to go to 'File' again, then to 'Export' and 'Add to Render Queue'.

This then took him to this menu, where he can change the name, format and anything else.

After all that, all he had to do was click 'Render' then his clip would be complete and be used for our title sequence.
This is how Dylan made the title for 'Lionsgate Pictures Presents':

Firstly, he had to create a new project. He did this by going to 'File' then 'New' then 'New Project'. Once there, all he had to do with click on the button.

After that he had to place the video he was going to edit for the title, into After Effects. He did this by selecting 'Edit' at the top, then going to 'Import' and finally going to 'File'.

Once selecting 'File', it brought up a menu with the video clips he can use for the placing the titles onto. To select one, he had to click on the once he wanted, which was number two, then click 'Open'.

This then placed the clip into After Effects, and will now allow him to drag it into the editor and begin working on it.

This is what it looks like once it has been dragged into the editor.

And here is the video preview for the clip once it has been placed into the editor.

Now he had to add in the text to display the title 'Lionsgate Pictures Presents'. To do this, he had to go to the editor where the video had been placed, right click on the mouse, then click 'New' and then 'Text'.

Once the video and text had been placed into the editor and positioned, He then moved onto adding the effect to the text to make it animated. To do this, there was a little menu next to the video that stated 'Effects & Presents'. Once there, I found the effect he wanted called 'Evaporated'.

Then he dragged over the effect on top of the text layer, let it load properly, then played it to see how it worked. This is what the effect looked like.

After viewing and sorting out any necessary tweaks to the text animation, he then had to export the clip so it would be suitable for Final Cut Pro. To do this, he had to go to 'File' again, then to 'Export' and 'Add to Render Queue'.

This then took him to this menu, where he can change the name, format and anything else.
After all that, all he had to do was click 'Render' then his clip would be complete and be used for our title sequence.
Media Feedback and changes I made
Things that I needed to improve and how I changed them:

-Spelling and Grammer in places is wrong. I went through my blog checking and rectifying my spelling and grammer as best as I could.
-Too many short paragraphs/sentences. I added more into my paragraphs and then condensed some of them together to make larger paragraphs.
-Too many unnecessary labels. I removed any unnecessary labels.
-Move some of my posts around to be in the correct order
Subscribe to:
Posts (Atom)